

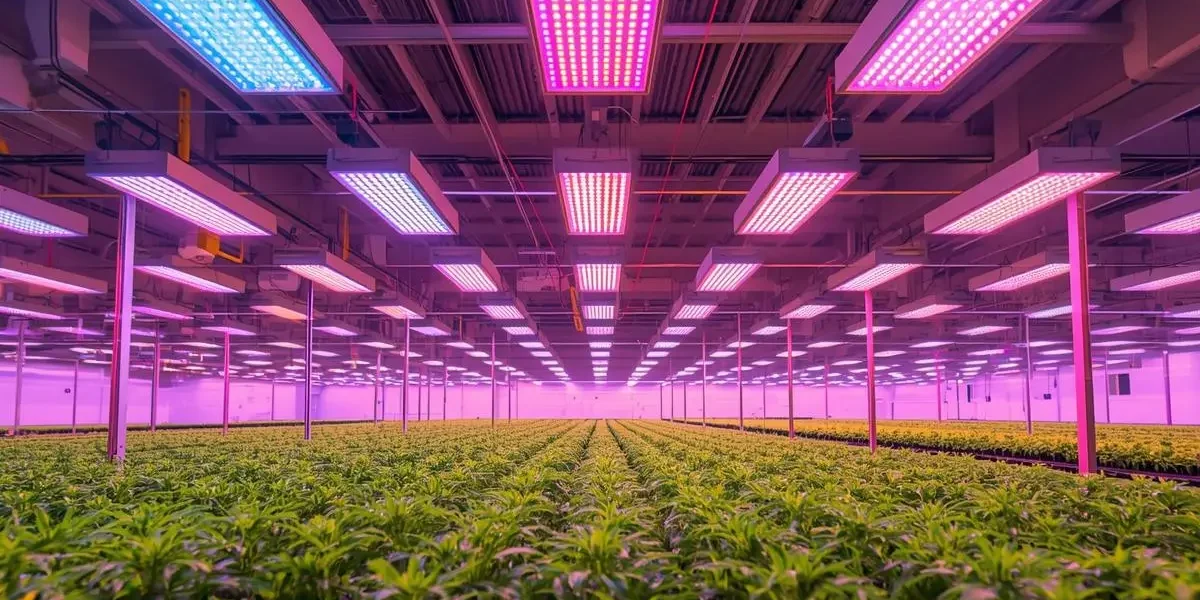
Thin, wobbling stems. Seedlings stretching two inches overnight, reaching for light that isn’t strong enough. Or the opposite — pale, bleached cotyledons curling away from a fixture that was way too close or too bright for where the plants actually were. Either way, the same root cause: the wrong light setup at the most critical stage of the grow.
Seedlings are more dependent on correct lighting than plants at any other point in their life cycle. They can’t compensate the way mature plants can. Get it wrong and they either stretch themselves weak or stress before they’ve produced a single true leaf. Get it right, and everything downstream is easier—transplanting, root establishment, the whole thing.
At Grow With Hydroponics, we’ve tracked lighting questions across thousands of growers, and grow lights for seedlings come up more than almost any other topic. This guide covers every practical angle: the numbers that matter, the exact distances and intensities by growth stage, how spectrum affects early development, the mistakes that quietly wreck seedling batches, and how to build a setup that works reliably every time.
Quick Answer — How Should You Set Up Grow Lights for Seedlings?
For seedlings, start LED grow lights at 24–30 inches above the tray at 30–50% intensity, targeting 100–200 µmol/m²/s PPFD during germination and 200–400 µmol/m²/s once true leaves emerge. Run 14–16 hours of light with an 8–10 hour dark period. Gradually lower the fixture or increase intensity as plants develop — never jump straight to full power. A dimmable full-spectrum LED is the most practical single tool for covering the entire seedling stage without changing fixtures.
Why Do Seedlings Need Different Grow Light Settings Than Mature Plants?
Seedlings need much lower light intensity than mature plants, but they’re also more sensitive to getting it wrong in either direction.
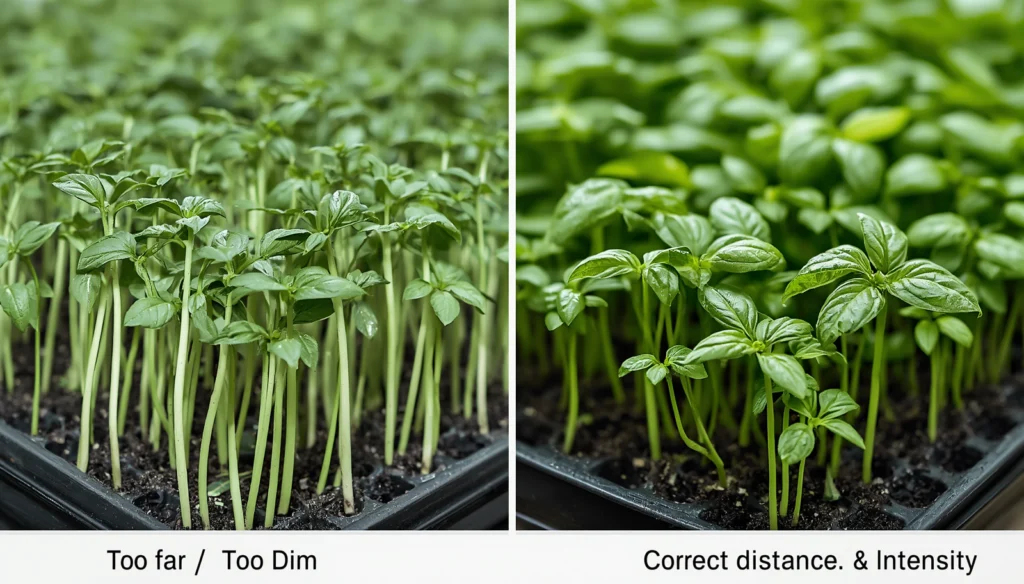
A mature tomato plant in flower can handle 700–900 µmol/m²/s PPFD without stress. A freshly sprouted tomato seedling at the same intensity will bleach, curl, and stall. The reason is simple: young seedlings have small leaf areas, shallow root systems, and photosynthetic apparatus that hasn’t fully developed yet. They can’t process high photon loads any more than a newborn can eat a full meal.
But here’s what catches people out the other way: run grow lights for seedlings too far away or at too low an intensity, and you create the “leggy” problem. Etiolation—the technical term for seedling stretch—happens when plants elongate their internodes trying to reach a light source that isn’t delivering enough PPFD. The stems get tall, thin, and structurally weak. I’ve seen basil seedlings double in height overnight just because the fixture was two feet too high.
The goal is controlled, appropriate intensity matched to the development stage. Not maximum power. Appropriateness.
What PPFD Do Seedlings Need at Each Stage?
The correct PPFD for seedlings changes as they develop — it’s not a fixed number through the whole propagation phase.
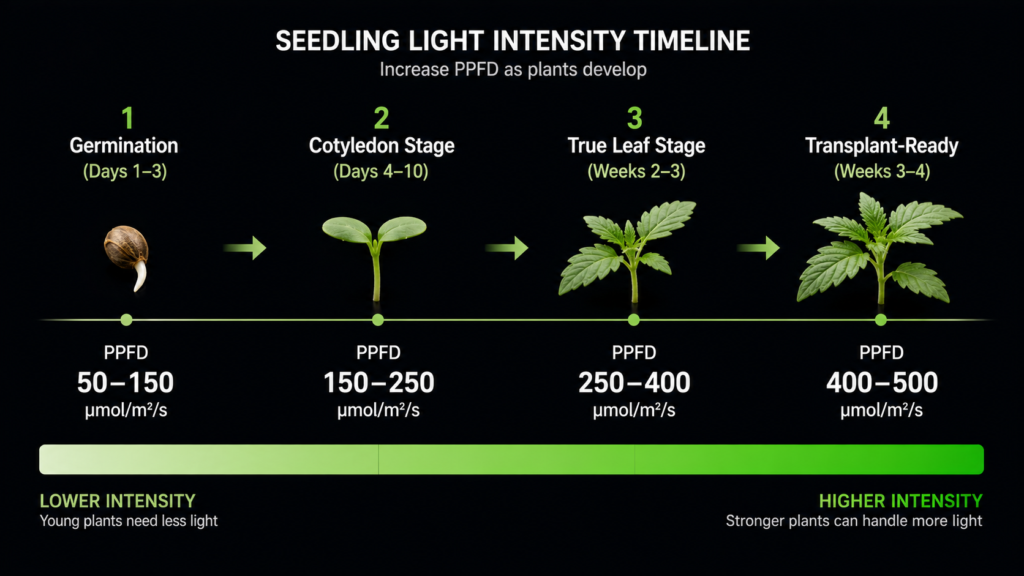
Here’s a stage-by-stage breakdown based on established PPFD targets for indoor propagation:
Germination (Days 1–3, Pre-Sprout)
Target PPFD: 50–150 µmol/m²/s
Seeds don’t need light to germinate — most germinate in the dark. But once a propagation area is lit, keeping intensity very low protects newly cracked seedlings from light stress before they’ve formed any photosynthetic tissue. At this stage, light isn’t doing much useful work for the seed itself.
Set the fixture at 24–30 inches, dimmed to 30–40% on a quality dimmable LED. If you’re using a propagation dome with humidity maintained at 90–95%, resist the temptation to light it aggressively at this stage.
Cotyledon Stage (Days 4–10)
Target PPFD: 150–250 µmol/m²/s
Once the seed leaves (cotyledons) open and start working, photosynthesis begins in earnest. This is when PPFD starts to matter practically. Still, cotyledons are small and delicate — 150–250 µmol/m²/s gives them enough light to develop without stressing tissue that’s still building its basic structure.
Airflow matters here too. Even gentle air movement from a small fan aimed near (not directly at) the tray builds stem thickness and keeps humidity from creating the conditions that cause damping off—the fungal collapse that kills young seedlings at soil level.
True Leaf Stage (Weeks 2–3)
Target PPFD: 250–400 µmol/m²/s
Once the first set of true leaves appears, the plant’s photosynthetic capacity increases significantly. This is when you can and should start stepping up intensity. Lower the fixture to 18–22 inches, or increase your dimmer to 60–75%, and watch how the plants respond over 48 hours before stepping up further.
This is also the stage where you’ll see the most obvious signs of getting it wrong. Too much, too fast — and leaf edges curl or bleach. Too little internode stretch and stems get spindly.
Transplant-Ready Stage (Weeks 3–4)
Target PPFD: 400–500 µmol/m²/s
By the time seedlings are ready to transplant, they should be handling light levels approaching early vegetative intensity. Stepping up to 400–500 µmol/m²/s at this point also acts as a light acclimation step—bridging the gap between propagation conditions and the stronger light environment they’ll encounter post-transplant.
Grow Lights for Seedlings: PPFD and DLI Reference by Crop
Not all seedlings have identical needs. Fruiting crops generally want higher DLI than leafy greens, even in the seedling phase.
| Crop | Seedling PPFD (µmol/m²/s) | Target DLI (mol/m²/day) | Photoperiod | Notes |
|---|---|---|---|---|
| Lettuce / Spinach | 150–300 | 10–16 | 14–16 hrs | Keep lower to prevent early bolting |
| Basil / Herbs | 150–300 | 12–17 | 14–16 hrs | Blue-dominant light keeps growth compact |
| Tomatoes | 200–400 | 14–20 | 14–16 hrs | Ramp up DLI as true leaves develop |
| Peppers | 200–350 | 12–18 | 14–16 hrs | Slower to develop; patience needed |
| Cucumbers | 200–400 | 14–20 | 14–16 hrs | Fast growers; watch for stretch |
| Microgreens | 100–250 | 8–14 | 12–16 hrs | Lower DLI acceptable at harvest |
| Cannabis seedlings | 150–300 | 12–18 | 16–18 hrs | Blue-weighted spectrum benefits early veg |
Always check your fixture’s published PPFD map at the hanging height you’re using. If you’re not familiar with PPFD targets for different crops and growth stages, see our PPFD for Plants: The Complete Hydroponics Lighting Guide.
Complete Seed-Starting Kits for Hydroponic Growers
If you’re setting up a propagation station from scratch, a complete growing kit takes the guesswork out of system selection. These kits include everything needed to get seedlings into a hydroponic system and growing.


What Spectrum Works Best for Seedlings?
For grow lights for seedlings, a broad white-based full spectrum is the most practical choice—and it’s what most quality LEDs deliver.
Why Blue Light Matters Early
Blue wavelengths (roughly 400–500 nm) are closely linked to compact, structured vegetative development. Blue-rich light keeps internodes short, leaves dense, and stems stiff. Plants grown under red-only or red-heavy light during the seedling stage frequently show unnecessary stretch and pale, thin tissue.
This doesn’t mean you need a specialist blue-only fixture. A good full-spectrum LED built on quality white diodes—Samsung LM301H, for example—delivers enough blue content to support compact seedling development across the board.
Why Full-Spectrum White Beats Blurple at This Stage
There’s a practical reason beyond photobiology: you can actually see your plants clearly under white-spectrum LEDs. Diagnosing damping-off, spotting pale yellowing before it progresses, catching stem stretch early—all of this is significantly harder under the purple-pink cast of blurple fixtures. At propagation scale, where you’re watching many small plants closely, visual clarity is genuinely useful.
Far-Red and UV: Not for Seedlings
Save the far-red supplementation for later stages. Far-red encourages stretch—exactly what you don’t want during propagation. UV similarly has no practical role at seedling stage for most growers and can stress young tissue. Keep things simple: good white-spectrum coverage at the right intensity.
How to Set Up Grow Lights for Seedlings: Step-by-Step
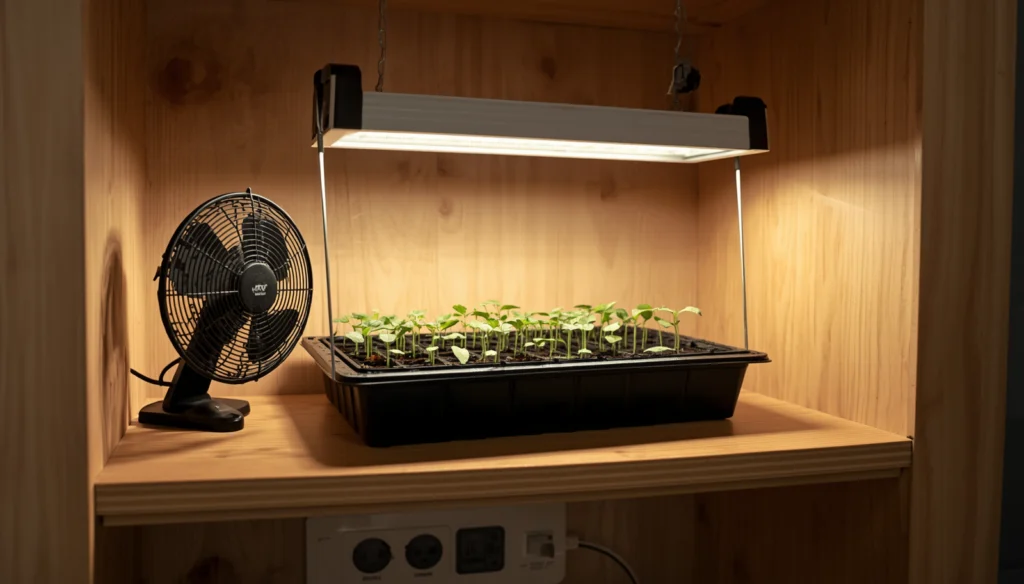
Choose a dimmable full-spectrum LED rated for your tray footprint. A 2×2 ft tray works well under a fixture designed for that coverage area. Avoid oversized high-power fixtures unless you can dim them down significantly.
Hang at 24–30 inches above the tray surface and set the dimmer to 30–40%.
Set a timer for 16 hours on, 8 hours off from day one. Consistency matters. Plants benefit from the dark period for metabolic recovery — running 24-hour light doesn’t speed germination and can cause accumulated stress.
Check PPFD at tray surface if you have a quantum PAR meter. Aim for 100–150 µmol/m²/s at the cotyledon stage and adjust from there. No meter? Watch plant response—stretching means more light, and curling or bleaching means less.
Add a small oscillating fan aimed near the tray, not directly at it. Just enough to create gentle air movement across the stems. This builds stem thickness through what’s called “thigmomorphogenesis”—physical stimulation triggering structural reinforcement.
Step up intensity every 5–7 days as true leaves develop, either by lowering the fixture 2–3 inches at a time or increasing the dimmer by 10–15%. Never jump intensity suddenly.
Transition to vegetative PPFD targets (400–600 µmol/m²/s) only when seedlings are clearly transplant-ready with multiple sets of true leaves and visible root development.
For more insight, read How to Diagnose Hydroponic Plant Problems Before They Kill Your Crop.
Shop Smart: Dimmable LED Grow Lights for Seedlings
The single most important feature in a seedling grow light is a smooth, full-range dimmer. It lets you start at 30% for germination, ramp through the cotyledon stage, and reach transplant-ready intensity without changing fixtures or hanging heights dramatically.
Look for verified PPF output, a named quality driver like Mean Well, and IP65 moisture resistance—propagation environments run humid and fixtures that aren’t rated for damp conditions will fail earlier than they should.
→ Browse recommended grow lights for seedlings and propagation



Common Grow Light Mistakes at the Seedling Stage
Starting at full power from day one. A flagship LED at full power over fresh seedlings is one of the fastest ways to bleach cotyledons and stall early growth. High-powered fixtures need to start dimmed — often at 30–40% — and ramp up over weeks.
Ignoring the dark period. Running grow lights for seedlings 24 hours a day doesn’t produce faster growth. Plants use their dark period to process sugars, complete metabolic repair, and build structural resources. Without darkness, accumulated stress compounds over days.
Not checking coverage uniformity. The centre tray seedlings get more light than the edges if the fixture doesn’t match the tray footprint. Rotate trays every few days if you notice uneven development across the batch, or use a wider bar-style fixture that delivers more even coverage.
Waiting too long to adjust. As seedlings grow taller, the distance between the canopy and the fixture shrinks—sometimes by an inch every few days during fast growth. Check the gap at least every three to four days and raise the fixture as needed.
Skipping airflow. This one surprises new growers. Damping-off is fungal, and it thrives in still, humid air. Even a small clip-on fan running at low speed near the propagation area dramatically reduces damping-off risk and builds stronger stem tissue at the same time.
How to Transition from Seedling Light to Vegetative Stage
The transition from seedling to vegetative lighting isn’t one moment—it’s a ramp. Here’s how to handle it without shocking plants.
- Week 3–4: Increase PPFD to 400–500 µmol/m²/s while plants are still in the propagation space. This is the light acclimation step.
- At transplant: Move the fixture to its vegetative height and intensity. If your veg light delivers 550–650 µmol/m²/s at 18 inches, the seedlings that just came from 450 µmol/m²/s will handle the step without stress.
- First week post-transplant: Keep intensity at the lower end of the veg range. Plants focus energy on root establishment in the first 5–7 days after transplanting—punishing them with high light at this point delays, not accelerates, recovery.
The DLI Calculator on the site makes it easy to cross-check whether your PPFD and photoperiod are hitting the daily light dose your crop needs at each stage. Worth using before you commit to a new setup rather than after a problem shows up.
Explore a complete guide on Daily Light Integral (DLI): The One Light Metric That Actually Predicts Plant Growth.
FAQ: Grow Lights for Seedlings
How far should grow lights be from seedlings?
For most mid-range full-spectrum LEDs, start at 24–30 inches above the tray at reduced intensity (30–50% dimmed). As true leaves develop and the plant matures toward transplant readiness, you can lower to 18–22 inches while gradually increasing intensity. The exact distance depends on your fixture’s output — always check the manufacturer’s PPFD map for your specific hanging height.
How many hours should seedling grow lights run per day?
Most seedlings do well on 14–16 hours of light with 8–10 hours of darkness. The dark period is not wasted time — plants use it for nutrient processing, sugar movement, and structural recovery. Running lights for 20+ hours or continuously can cause accumulated light stress and weak root development. Use a timer set to the same cycle every day for consistency.
What is the best spectrum for seedling growth?
A broad full-spectrum white LED is the most practical choice for grow lights for seedlings. It delivers enough blue wavelengths (400–500 nm) to promote compact growth and short internodes, while also making it easy to visually assess plant health. Avoid red-heavy or blurple fixtures during propagation—they can encourage unnecessary stretch and make it difficult to spot early problems like damping-off or pale yellowing.
Why are my seedlings leggy under grow lights?
Leggy seedlings almost always mean the light intensity is too low—the PPFD at canopy level isn’t high enough for the growth stage. The fix is to lower the fixture, increase the dimmer setting, or both. Also check your photoperiod: if you’re running only 10–12 hours, increasing to 14–16 hours raises DLI without changing PPFD. Leggy seedlings are rarely a spectrum problem and almost never a genetics problem.
Can I use the same LED grow light for seedlings and vegetative growth?
Yes—a dimmable full-spectrum LED can cover both stages. The key is dimming it down to 30–50% for seedlings and ramping up to full or near-full intensity for vegetative growth. This is exactly why dimming capability matters: it gives you one fixture that grows with your plants from day one rather than requiring specialist propagation lighting for the early stages.
Build the Foundation Right
The seedling stage is short—usually three to five weeks—but what happens during it echoes through the entire grow. Strong, compact seedlings with developed root systems transplant faster, establish quicker, and perform better through veg and into flower or harvest. Weak, leggy seedlings from inadequate or mismanaged grow lights never quite catch up.
The numbers aren’t complicated. Start at 100–200 µmol/m²/s during germination, ramp to 300–400 at true leaves, run 14–16 hours with a consistent dark period, and use a dimmable full-spectrum LED matched to your tray footprint. Adjust based on what you see, not just what a general guide says.
Grow With Hydroponics has free calculators—including the Grow Light Calculator, Advanced PPFD Grid, DLI & Crop Optimizer—to help you verify your daily light dose before problems show up rather than after. The goal is always the same: remove the guesswork and build on something solid.
If you’re looking for the complete picture on lighting—the nuts and bolts, the spectrum science, the works—we put everything into one place with LED Grow Lights Guide: How to Choose, Use, and Optimize for Indoor Growing (2026).
