
How to Use CO₂ Enrichment in a Grow Room: The Complete Guide
A lot of growers add CO₂, see nothing happen, and conclude it doesn’t work. The equipment was fine. The CO₂ was real. The problem, almost always, was that the lights weren’t strong enough to use it.
CO₂ enrichment is not a standalone upgrade. It’s a multiplier—and multiplying a weak signal produces a weak result. Before you spend money on tanks, regulators, or generators, this guide will tell you exactly what needs to be in place first, which delivery method suits your setup, how long your tank will actually last, and what the safety thresholds mean in practical terms.
At Grow With Hydroponics, we built the CO₂ calculator above to remove the guesswork from the calculation side. This guide handles everything around it — the decisions, the context, and the common mistakes that make CO₂ enrichment feel pointless when it absolutely isn’t.
Why CO₂ Enrichment Works — and When It Doesn’t
Plants fix carbon through photosynthesis. Ambient outdoor air sits at roughly 400–420 ppm CO₂. Inside a sealed or semi-sealed grow room, plants can pull that concentration down significantly within a few hours of lights-on—especially in a dense canopy with high light intensity.
Raising CO₂ to 1,000–1,500 ppm accelerates the photosynthetic reaction. Plants process sugars faster, grow more tissue per unit of light, and use water more efficiently when CO₂ is abundant and light intensity is sufficient.
That last phrase matters. CO₂ and light intensity work together—one without the other delivers near-zero benefit.
The Light Intensity Threshold You Must Know First
This is the most important fact in CO₂ enrichment, and most beginner guides skip it entirely.

Research on CO₂ enrichment and light intensity in controlled-environment lettuce production found that growth parameters including fresh weight, dry weight, and leaf area increased stepwise as both light intensity and CO₂ concentration were raised—but the two variables are interdependent. Higher CO₂ only delivered measurable growth improvements when light intensity was sufficient to drive the reaction.
In practical terms for most hydroponic growers:
| PPFD at Canopy | CO₂ Enrichment Effect | Recommendation |
|---|---|---|
| Below 400 µmol/m²/s | Negligible to zero | Don’t bother with CO₂ yet—improve lighting first |
| 400–600 µmol/m²/s | Marginal | CO₂ may help, but ROI is low |
| 600–900 µmol/m²/s | Moderate — worth doing | 1,000–1,200 ppm target is appropriate |
| 900–1,200 µmol/m²/s | Significant | 1,200–1,500 ppm delivers meaningful yield gains |
| Above 1,200 µmol/m²/s | Maximum benefit zone | Full enrichment protocol, 1,500 ppm justified |
Without CO₂ supplementation, light saturation for most crops occurs at approximately 400–600 µmol/m²/s. Adding CO₂ above ambient levels raises that saturation point, allowing plants to use higher light intensities without photosynthetic stalling.
The takeaway is straightforward. If you’re running a cheap blurple panel or a low-wattage LED strip, CO₂ enrichment will do almost nothing. Get your canopy PPFD above 600 first. Not sure where you’re at? Use the DLI Calculator to cross-check your daily light integral against your photoperiod and confirm whether your lighting setup is ready to benefit from CO₂.
CO₂ Target Levels by Growth Stage
Not every stage needs the same CO₂ concentration. Higher levels during active growth and flowering make sense. Seedlings and early propagation stages don’t need enrichment at all — their light requirements are low and the CO₂ demand matches it.
| Growth Stage | Recommended CO₂ (ppm) | Notes |
|---|---|---|
| Propagation / Clone | 400–500 | Ambient is sufficient — enrichment not needed |
| Seedling | 400–600 | No enrichment required until established |
| Vegetative | 800–1,200 | Enrichment starts paying off above 600 PPFD |
| Flowering / Fruiting | 1,000–1,500 | Maximum yield benefit with high PPFD |
| Late Flower (final 2 weeks) | 400–800 | Some growers reduce CO₂ as ripening begins |
Running 1,500 ppm during vegetative growth under weak lights is not just wasteful—it’s a sign something isn’t calibrated. Match your CO₂ target to your light intensity and your growth stage, and the numbers will start making sense together.
CO₂ Delivery Methods Compared — Tank, Generator, or Bag?
This is the question most growers search for before they buy anything. The honest answer depends entirely on your room size, budget, and how much hands-on management you want to do. Each method has a real use case and a real limitation.
As a general rule of thumb, larger grow rooms use generators and smaller grows use tanks. CO₂ tanks are safer to use but more expensive and inconvenient to refill. Generators are much cheaper to run but create significant additional heat that must be accounted for in the room’s climate management.
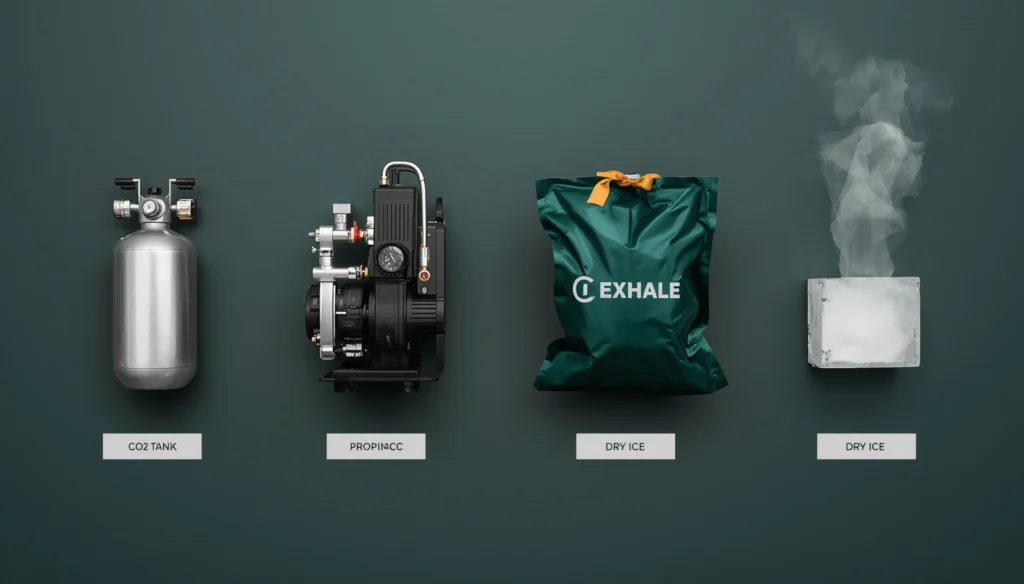
| Method | Best For | Upfront Cost | Ongoing Cost | Control Level | Risk Level |
|---|---|---|---|---|---|
| Compressed tank + regulator | Tents, small sealed rooms | Medium ($80–$200) | Medium (refills) | High — precise PPM control | Low |
| CO₂ generator (propane/natural gas) | Medium to large rooms (200+ ft³) | High ($300–$800) | Low | Medium — controller required | Medium (heat + CO₂ + fire) |
| CO₂ bags (mycelium-based) | Beginners, small tents, organic grows | Low ($20–$40) | Low (replace at 6 months) | None — passive only | Very low |
| Dry ice | Emergency use, very short-term | Variable | High per use | None | Medium (cold burns, sublimation) |
Compressed CO₂ Tanks — Best Choice for Most Home Growers
CO₂ tanks are the most versatile method for growing tents and small grow rooms. They release CO₂ into the atmosphere once opened and tend to spread further and penetrate deeper than a CO₂ bag. Due to their ease of use and high efficiency, CO₂ tanks tend to be the most commonly used CO₂ delivery method among indoor cultivators.
A standard setup is a 20 lb aluminium CO₂ tank, a dual-stage regulator with a solenoid, distribution tubing pre-drilled and hung above the canopy so CO₂ disperses downward through the plant zone, and a CO₂ controller or monitor that triggers the solenoid when PPM drops below your target.
The solenoid + controller combination is not optional if you’re running a sealed room. General Hydroponics advises against attempting to calculate dosing time manually and using a simple timer instead of a CO₂ controller—there are too many variables, and miscalculations create unsafe conditions. A dedicated CO₂ controller costs $60–$150 and pays for itself by not wasting gas between dosing cycles.
CO₂ Generators — For Larger Sealed Rooms With Strong Ventilation
Propane and natural gas CO₂ generators burn fuel to produce CO₂ and water vapour. They’re significantly cheaper to run than compressed tanks at scale, but they produce substantial heat as a byproduct, which means your HVAC load increases proportionally.
Generators must be hung securely and at least a foot or more from the ceiling. They pose a potential fire hazard if knocked over or if they come into contact with flammable material. For home growers already managing temperatures in a tight space, a generator that adds meaningful BTUs per hour is often more trouble than it’s worth. Evaluate your heat management capacity honestly before choosing this route.
CO₂ Bags — Passive Enrichment for Small Spaces and Beginners
CO₂ bags contain a mycelial mass that produces CO₂ as it decomposes organic matter. They are cost-effective for small to medium-sized grow spaces compared to generators and require no heat, electricity, or monitoring—CO₂ is released slowly as the mycelium metabolises its substrate over several months.
A CO₂ bag hung above the canopy in a sealed tent will provide passive enrichment at no ongoing operational cost. It won’t hit 1,500 ppm. It won’t be controllable. But it will give you a real-world look at what elevated CO₂ does to your plants before you invest in tanks, regulators, and controllers.
For a first-time grower curious about CO₂ enrichment, a bag is a genuinely sensible starting point. Don’t expect transformative results — do expect to see what a modest CO₂ bump looks like in practice before spending more.
Ventilation Equipment That Supports CO₂ Management
CO₂ enrichment only works efficiently in a well-managed grow environment. Inline fans, carbon filters, and speed controllers give you the airflow control to prevent CO₂ pooling, distribute enriched air across the canopy, and safely exhaust the room before entry.
These are the ventilation tools most paired with CO₂ management setups across all room sizes.


CO₂ Tank Size and Runtime Guide — How Long Will It Last?
This is one of the most searched questions around CO₂ enrichment, and it rarely gets a direct answer. Here’s the honest picture, based on a sealed or semi-sealed room dosing to maintain 1,200 ppm with ambient at 420 ppm, using a timer-controlled regulator cycling 15–20 minutes per hour during lights on.
| Tank Size | Room Volume | Approx. Runtime | Best For |
|---|---|---|---|
| 5 lb | Up to 100 ft³ | 2–4 weeks | Small tents (2×2, 2×4) |
| 10 lb | 100–200 ft³ | 3–5 weeks | Medium tents (4×4) |
| 20 lb | 100–300 ft³ | 4–8 weeks | Large tents, small rooms |
| 50 lb | 300–800 ft³ | 6–12 weeks | Dedicated grow rooms |
Factors that shorten runtime significantly:
- Leaky tent or room (CO₂ escapes before plants can use it)
- High exhaust fan duty cycle (venting enriched air out before plants absorb it)
- Running higher than necessary PPM targets
- Frequent door openings
Factors that extend runtime:
- Well-sealed environment
- CO₂ controller vs timer (controller only doses when needed—no waste)
- Enriching only during peak photosynthesis hours (2–4 hours after lights-on through lights-off)
A well-sealed 4×4 tent (approximately 112 ft³) with a CO₂ controller and a 20 lb tank will typically run 5–7 weeks between refills at a 1,200 ppm target. A loosely sealed tent running the same setup on a timer instead of a controller may exhaust the same tank in 3 weeks.
Refills are available at most welding supply stores, some homebrewing retailers, and select hydroponic shops. The cost per refill is typically $15–$40 depending on tank size and location. CO₂ tank swaps (exchange a depleted tank for a full one) are faster and more common at welding suppliers.
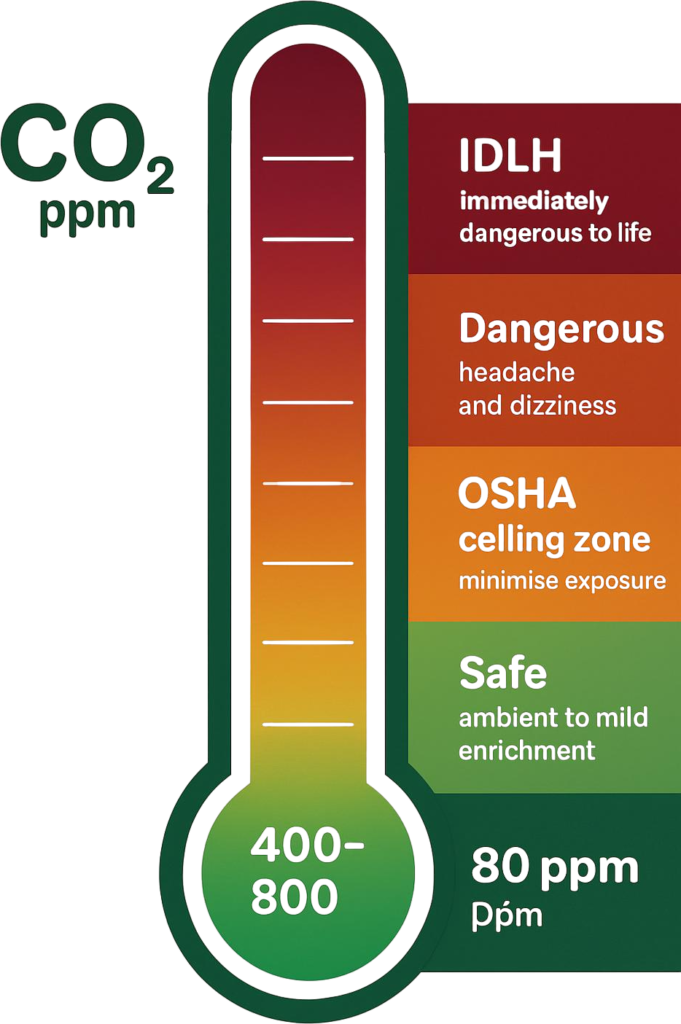
CO₂ Safety Thresholds — Know Before You Dose
This section isn’t here for legal reasons. It’s here because CO₂ is heavier than air, odourless, and colorless—which means you can walk into a dangerous situation without knowing it until you’re already lightheaded.
CO₂ safety in a grow room is not complicated, but it does require understanding what the numbers actually mean for human health.
OSHA Reference Thresholds
| CO₂ Level (ppm) | What It Means | Human Effect |
|---|---|---|
| 400–420 | Ambient outdoor air | Normal, no effect |
| 800–1,000 | Slightly elevated indoor air | Mild drowsiness for sensitive individuals on long exposure |
| 1,000 | OSHA Permissible Exposure Limit (PEL) — 8-hour TWA | Action level for enclosed workspace ventilation |
| 1,200–1,500 | Typical grow room enrichment target | Safe for plants; humans should avoid prolonged exposure |
| 2,000–3,000 | Noticeably stuffy; CO₂ buildup indicator | Headache, impaired concentration on sustained exposure |
| 5,000 | OSHA ceiling limit—short-term exposure maximum | Headache, dizziness, increased respiratory rate |
| 10,000+ | Dangerous for humans within minutes | Severe headache, rapid breathing, potential loss of consciousness |
| 40,000+ | Immediately Dangerous to Life and Health (IDLH) | Rapid loss of consciousness; fatal on sustained exposure |
The enrichment range you’re targeting — 1,000–1,500 ppm — is safe for plants and not acutely dangerous for brief human entry. But it is above OSHA’s 8-hour permissible exposure limit, which means it’s not an environment to work in for extended periods.
Practical Safety Rules for Home Growers
1. Never enter a sealed room during active CO₂ injection. Turn off the solenoid, wait for the ventilation cycle to exchange the air, then enter. Most CO₂ controllers include an entry lockout or alarm for exactly this purpose.
2. CO₂ sinks. It’s heavier than air and accumulates at floor level first. If you’re crouching or lying down in an enriched space for any reason—checking roots or fixing a pump—your face is in the highest-concentration zone.
3. Install a CO₂ monitor in any room where you spend significant time. A basic CO₂ monitor costs $30–$60 and gives you a live PPM reading. If the controller fails open and floods the room, you’ll know immediately rather than discovering it when you feel dizzy.
4. Children and pets should never enter an enriched grow room. This is not a precaution to be casual about.
5. Seal sources of CO₂ leakage at the tank and regulator. Compressed CO₂ leaking at the regulator connection can create a slow CO₂ buildup in an attached room or garage. Check fittings with soapy water on installation and after every tank swap.
How to Calculate CO₂ for Your Grow Room
The calculator at the top of this page handles the maths. Here’s what it’s actually computing, so the result makes sense.
The CO₂ Formula
CO₂ needed (ft³) = Room Volume (ft³) × (Target PPM − Ambient PPM) ÷ 1,000,000Then divide by your dosing window in hours to get flow rate:
Flow Rate (ft³/hr) = CO₂ needed ÷ Dosing Window (hours)Example: A 4×4×7 ft tent is 112 ft³. Ambient CO₂ is at 420 ppm, target 1,200 ppm.
- CO₂ needed = 112 × (1,200 − 420) ÷ 1,000,000 = 0.087 ft³
- Dosing over 3 hours = flow rate of 0.029 ft³/hr
That’s a very small flow rate, which is why most regulators are set to the lowest end of their range. The CO₂ calculator above handles the conversion between cubic feet and litres if you’re working in metric.
CO₂ Requirements by Grow Room Size
| Room Volume | CO₂ to Raise to 1,200 ppm | Recommended Strategy |
|---|---|---|
| 50 ft³ (2×2×7 tent) | ~0.04 ft³ | Passive bag or small tank with timer |
| 112 ft³ (4×4×7 tent) | ~0.09 ft³ | 20 lb tank + controller |
| 200 ft³ (small room) | ~0.16 ft³ | 20–50 lb tank + controller |
| 500 ft³ (medium room) | ~0.39 ft³ | 50 lb tank or small generator |
| 1,000+ ft³ (large room) | ~0.78 ft³+ | Generator + full automation |
These figures assume ambient starting at 420 ppm and a well-sealed environment. Loosely sealed spaces require more CO₂ to maintain the target because enriched air escapes continuously. If your exhaust fan is running at full speed while you’re enriching, you’re venting most of what you just dosed. Time CO₂ injection during lights-on hours with exhaust on low or cycled—not running constantly.
How to dial in your grow room environment: VPD Calculator—connects CO₂ management to VPD monitoring as the two key environmental controls.
CO₂ Enrichment Best Practices for Hydroponics
A few operational notes that don’t fit neatly into any single section but make a real difference to results:
Inject CO₂ above the canopy, not at floor level. CO₂ is heavier than air and will sink through the canopy toward the root zone. Distributing it from above gives plants the most exposure time as it descends. Pre-drilled distribution tubing hung 6–12 inches above the canopy is the standard setup with compressed tank systems.
Run CO₂ during lights-on only. Photosynthesis requires light. Plants don’t fix carbon in the dark, so dosing during the dark period is pure waste. Set your controller or timer to operate only when lights are on—ideally from 1–2 hours after lights-on through 30–60 minutes before lights-off.
Raise temperature slightly when running elevated CO₂. CO₂ enrichment shifts the optimal temperature range upward. Plants running 1,200–1,500 ppm CO₂ generally perform better at 26–30°C than at the standard 22–26°C. This is also why CO₂ generators—which produce heat—are less problematic than they seem in theory: the heat they generate often matches the slightly warmer optimal range for enriched grows.
Don’t enrich a room with an active pest or disease problem. CO₂ doesn’t kill pathogens, and the slightly warmer, more humid conditions that often accompany enriched grows can accelerate mould and pest spread. Sort your environment before adding CO₂.
Track CO₂ PPM continuously. A controller that reads PPM in real time and triggers the solenoid only when levels drop below target is far more efficient than any timed system. Tank runtime improves, PPM stays more consistent, and you never accidentally build up to unsafe levels.
Common CO₂ Mistakes Growers Make
Adding CO₂ before improving lighting. The most common and expensive mistake. CO₂ without adequate PPFD is money spent on nothing. If your canopy PPFD is below 600, address the lighting first.
Using a timer instead of a controller. Timers can’t read PPM. They open the solenoid on schedule regardless of whether CO₂ is needed. On a cold morning when CO₂ levels are already near target, a timer dumps more gas anyway. Controllers cost more but pay back quickly in reduced tank consumption.
Running exhaust and enrichment simultaneously at full speed. Your exhaust fan is fighting your CO₂ injection. Cycle the exhaust to off or low during dosing periods, especially in well-sealed setups. In tents with passive exhaust, this is less of an issue, but in rooms with dedicated inline fans, the two systems need to be coordinated.
Enriching the wrong space. CO₂ enrichment only works in reasonably sealed environments. A greenhouse with open vents, a grow room with significant air gaps, or a space with continuous high-CFM ventilation cannot maintain elevated CO₂ concentrations. Seal the space first, then enrich it.
Ignoring CO₂ in the final weeks of flower. Some growers cut CO₂ too early. Most crops benefit from enrichment right through to 1–2 weeks before harvest. Stopping enrichment at week 6 of an 8-week flower leaves yield on the table for no good reason.
Frequently Asked Questions About CO₂ Enrichment
What is the ideal CO₂ level for hydroponic plants?
For most hydroponic crops during vegetative growth, 800–1,200 ppm is the productive range. During flowering and fruiting with high-intensity lighting (above 800 PPFD), 1,200–1,500 ppm delivers the best results. Levels above 1,500 ppm offer diminishing returns for most crops and increase the cost of enrichment without proportional yield gains. Always pair your CO₂ target with a light intensity that can actually use it — check the PPFD table above.
Does CO₂ enrichment work in a grow tent?
Yes, if the tent is well sealed and light intensity is adequate. A 4×4 tent under a quality 600–800W LED with a CO₂ controller and a 20 lb tank will produce measurable improvements in growth rate and canopy density within 2–3 weeks. A loosely sealed tent with constant high-speed exhaust will not; enriched air exits as fast as it enters. Seal duct connections, zip all tent openings properly, and use the exhaust fan on a cycle rather than continuously.
How often do I need to refill my CO₂ tank?
That depends on room volume, target PPM, sealing quality, and whether you’re using a controller or timer. As a rough guide: a 20 lb tank in a well-sealed 4×4 tent with a CO₂ controller targeting 1,200 ppm typically lasts 5–7 weeks. Use the calculator above with your specific room dimensions and target to get a more accurate runtime estimate based on your actual numbers.
Is CO₂ enrichment safe for home growers?
Yes, with straightforward precautions. Never enter a sealed room during active injection. Install a CO₂ monitor. Keep children and pets out of enriched spaces. Check regulator fittings for leaks on installation and after every tank swap. The enrichment levels used in grow rooms are not immediately dangerous for brief human entry, but they are above OSHA’s recommended 8-hour exposure limit — so you don’t want to be working in there for hours at a stretch.
Can I use CO₂ enrichment with organic hydroponic nutrients?
Yes. CO₂ doesn’t interact with your nutrient solution directly — it works through the air in your grow room, not through the root zone. The only consideration is that CO₂ bags (mycelium-based) are often marketed as the “organic” delivery method. Compressed tank CO₂ is an inert gas regardless of your nutrient choice—it’s not a synthetic additive in any meaningful sense.
CO₂ Works, But Only When Everything Else Is Ready
The growers who get the most from CO₂ enrichment are almost never the ones who added it first. They’re the ones who dialled in lighting, nutrients, VPD, and pH — and then added CO₂ as the final multiplier on a system that was already running well.
The key takeaways:
- CO₂ without adequate light is wasted—confirm PPFD above 600 µmol/m²/s before enriching
- Tank + controller is the right starting point for most home grows—precise, safe, and practical
- Know the safety thresholds—1,000 ppm is the OSHA action level; 5,000 ppm is the ceiling
- Match your tank size to your room ——a0 lb tank in a 4×4 tent runs 5–7 weeks with a controller
Use the calculator at the top of this page to calculate your exact CO₂ requirement, flow rate, and dosing window before you buy anything. The numbers remove the guesswork.
Grow With Hydroponics has the full tool suite—including the VPD Calculator to manage humidity and temperature alongside CO₂, and the DLI Calculator to confirm your lighting before you start enriching. All free, no signup.
Gardening rarely rewards guesswork. CO₂ enrichment rewards preparation.
Recommended Hydroponic Growing Kits
A well-equipped setup makes CO₂ management dramatically easier. These growing kits are chosen for practical environmental management — proper sealing, airflow design, and room for sensor placement — not just yield claims.


Related Tools
- VPD Calculator — CO₂ and VPD are the two environmental levers. Dial in humidity and temperature alongside your CO₂ enrichment for maximum effect.
- DLI Calculator — Confirm your canopy PPFD before investing in CO₂. If your DLI is too low for your crop stage, lighting comes first.
- EC ↔ PPM Calculator — With CO₂ enrichment active, growth rate increases and nutrient demand follows. Keep your EC calibrated as growth accelerates.
- Plant Health Diagnosis Tool — If plants aren’t responding to enrichment as expected, run a symptom check before adjusting CO₂ further.
- Hydroponic Nutrient Calculator — Higher growth rates from CO₂ enrichment increase macro and micronutrient demand. Recalculate your nutrient formula when running enrichment for the first time.