
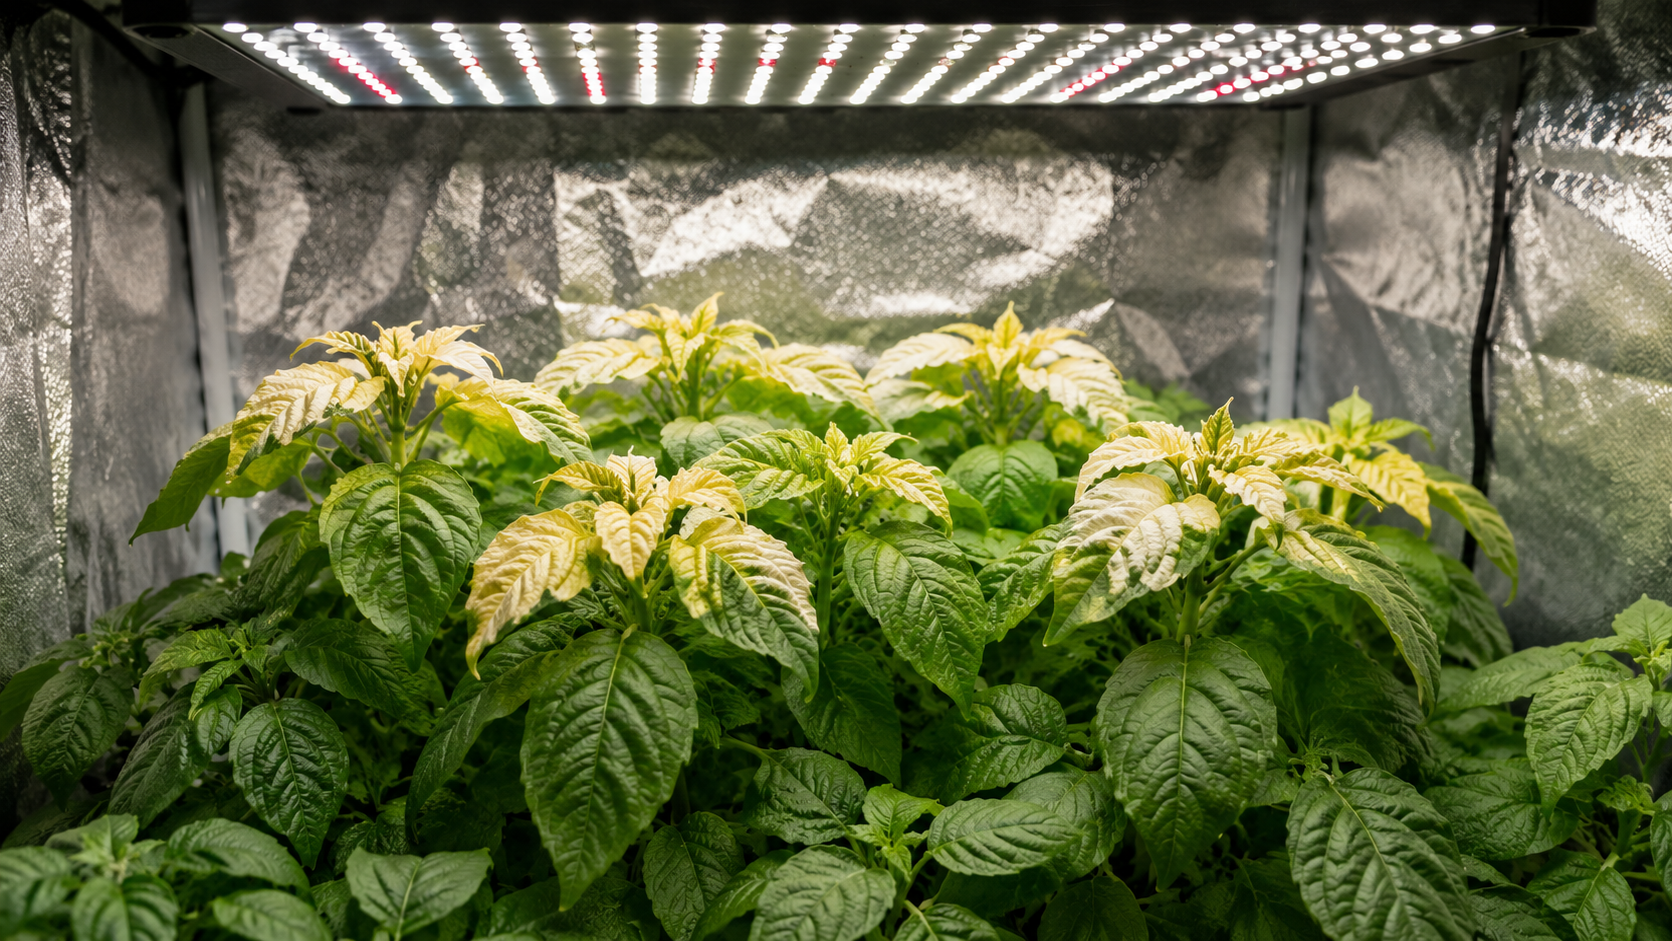
The leaves at the top of your canopy are turning yellow. Maybe the edges are going crispy. You’ve checked your pH, tested your EC, and gone through your nutrient schedule twice—and everything looks fine on paper. So you start chasing phantom deficiencies, adjusting what doesn’t need adjusting, while the actual problem hangs right above your plants, running at full power.
Light burn is one of the most misdiagnosed problems in indoor growing. It’s common, it’s fixable, and it’s almost always preventable—but only if you know what you’re actually looking at. At Grow With Hydroponics, we see this crop up constantly, especially when growers upgrade to higher-output LEDs without adjusting their setup accordingly. This guide covers every practical angle: what light burn looks like, why it happens, how to tell it apart from nutrient problems, how to fix it quickly, and what to do so it doesn’t come back.
Quick Answer — What Is Light Burn on Plants?
Light burn occurs when plants are exposed to more light intensity than they can process — typically because a grow light is too close to the canopy, running at too high an intensity, or both. Symptoms appear on the upper leaves closest to the light source: yellowing, bleaching, crispy edges, and upward leaf curl. The fix is to raise the fixture, reduce intensity using a dimmer, or both. Damaged leaves won’t recover, but new growth will be healthy once the cause is corrected.
What Does Light Burn Look Like on Plants?
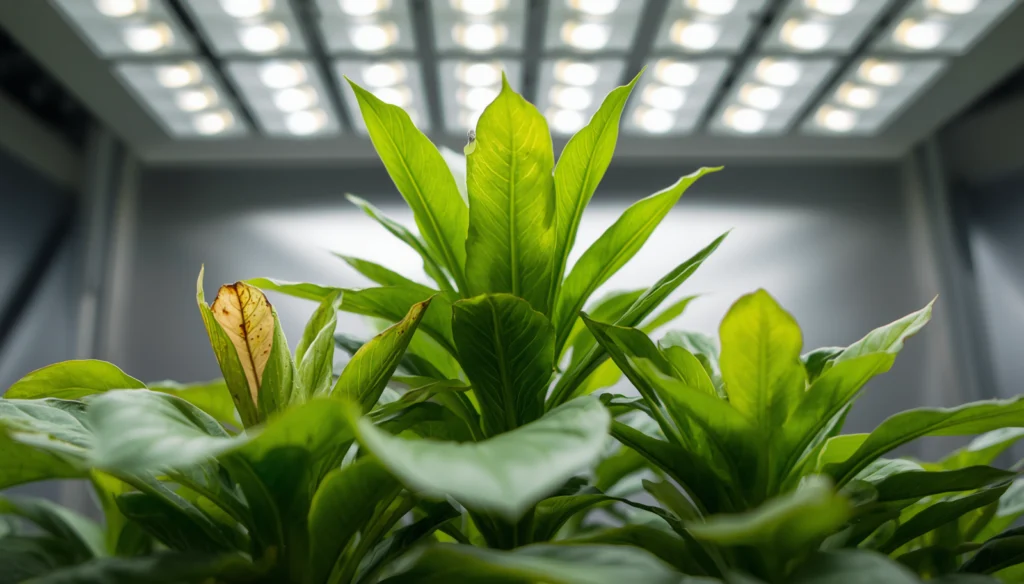
Light burn shows up first—and most severely—on the leaves at the very top of your canopy. That location is the single clearest diagnostic clue.
Specifically, watch for:
- Yellowing or bleaching on upper leaves, which may fade to pale yellow or almost white in severe cases
- Crispy, dry leaf edges and tips that feel brittle to the touch
- Upward leaf curl—sometimes called “taco-ing”—where leaves fold up along the midrib trying to reduce their light-facing surface area
- Brown spots concentrated on the parts of the leaf sitting directly under the light
- Leaves that won’t come off—this one matters for diagnosis; light-burned leaves stay firmly attached even when severely damaged, whereas nitrogen-deficient leaves drop or pull away easily
Symptoms develop on a gradient. If your fixture is only slightly too close, you’ll see slow yellowing developing over days or even weeks, as leaves die earlier than they should rather than burning acutely. Push it further over the line, and the bleaching happens faster, with leaves turning pale and papery relatively quickly.
The Leaf-Pull Test
Here’s a quick field check. Grip a yellowing top leaf and apply gentle upward pressure. If it resists and stays attached, suspect light burn. If it releases easily or has already dropped, the cause is more likely a nutrient deficiency — particularly nitrogen. It’s not a perfect diagnostic, but it’s a fast first filter.
How Is Light Burn Different From Nutrient Burn or Deficiency?
This is where most growers lose time. Light burn, nutrient burn, and nitrogen deficiency can all produce yellowing leaves — but they look different in different places.
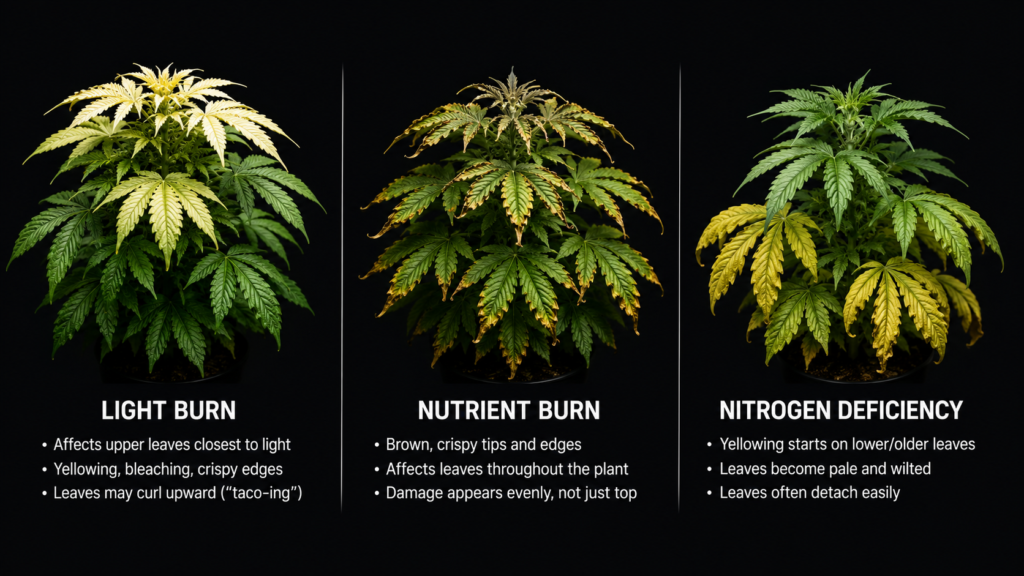
The location of symptoms is your primary guide:
| Symptom | Light Burn | Nutrient Burn | Nitrogen Deficiency |
|---|---|---|---|
| Affected leaves | Top of plant, closest to light | Leaf tips and edges, all over plant | Bottom of plant, moving upward |
| Colour change | Yellow to white/bleached | Brown, crispy tips; not bleached | Pale yellow, soft wilting |
| Leaf texture | Firm, won’t detach | Dry, crispy tips | Wilted, detaches easily |
| Pattern | Directly under the light source | Evenly distributed on affected leaves | Progressive from oldest leaves |
| Progression | Stable once light is corrected | Continues unless feeding is changed | Continues without nitrogen correction |
And here’s something growers often miss: a plant that’s already dealing with a nutrient deficiency will develop light burn at lower light intensities than a healthy plant would. The two problems compound each other. So if you’re chasing a deficiency and also running the light too close, you’ll feel like nothing you do is working — because only half the problem is being addressed. Try our free Tool guide The Truth About Hydroponic Nutrient Calculators.
What Causes Light Burn in Hydroponics?
Light burn has three root causes, and they often overlap.
1. Fixture Too Close to the Canopy
This is the most common cause by a significant margin. Plants grow upward — especially during the stretch phase in flowering crops — and growers don’t always keep pace with adjustments. A fixture that was fine at week two becomes a problem by week five as the canopy closes in on it.
LEDs made this subtler to catch. Old HPS fixtures put out enough radiant heat that you’d feel it before leaves started showing problems. Modern LEDs run cool enough that there’s no heat signal to warn you — the light intensity damages leaves without any obvious warmth. That’s genuinely useful in most ways, but it removes a natural early-warning system.
2. Intensity Too High for the Growth Stage
Seedlings need around 100–300 µmol/m²/s PPFD. Running a high-output fixture at full power over propagation trays — which happens more than you’d think — overwhelms young plants that haven’t developed the photosynthetic capacity to handle it yet. The same fixture that’s appropriate for a flowering canopy will burn seedlings without mercy.
3. Photoperiod Too Long Without a Dark Period
Plants need a rest cycle. Running lights for 20+ hours thinking it’ll speed things up doesn’t work the way growers hope. Without adequate dark periods, plants can’t complete basic metabolic recovery, and the accumulated light stress makes them more susceptible to burn at intensities they’d otherwise handle fine. Most leafy greens do well on 14–16 hours. Fruiting crops are typically 18 hours in veg, 12 in flower. Twenty-four hours of continuous light is rarely a good idea and often a contributing factor in persistent light stress.
Recommended LED Grow Light Distances by Growth Stage
These are practical starting points for mid-range full-spectrum LED fixtures. Treat them as the beginning of a dial-in process, not a fixed answer—because your specific fixture’s PPF output, beam angle, and dimmer setting all shift the numbers.
| Growth Stage | LED Distance (Approx.) | Target PPFD (µmol/m²/s) | Notes |
|---|---|---|---|
| Germination / Seedlings | 24–36 inches | 100–300 | Err on the far side; fragile tissue |
| Early Vegetative | 18–24 inches | 300–500 | Increase gradually as plants develop |
| Mid-Late Vegetative | 16–22 inches | 400–600 | Adjust as canopy grows upward |
| Flowering / Fruiting | 12–18 inches | 600–900+ | Monitor closely; canopy rises fast |
| High-power fixtures (600W+) | Add 6–10 inches to above | Variable | Higher wattage = more distance needed |
Always check your fixture’s published PPFD map at the hanging height you’re using. A map that shows 900 µmol/m²/s at 18 inches tells you more than any general table can.
Read PPFD for Plants: The Complete Hydroponics Lighting Guide.
How to Fix Light Burn — Step by Step
Once you’ve confirmed it’s light burn and not a nutrient issue, the fix is straightforward. The difficult part is resisting the urge to do more.
Step 1: Raise the fixture immediately. Move it up by 4–6 inches from its current position. Don’t overthink the exact measurement—just get the distance between the canopy and the source.
Step 2: Dim the light if your fixture allows it. Most quality LEDs are dimmable. Drop to 70–80% intensity while you assess. This achieves a similar effect to raising the fixture and gives you more flexibility to fine-tune.
Step 3: Do not remove damaged leaves yet. Burnt leaves, even if they look awful, are still doing some photosynthesis and providing the plant with resources. Pruning aggressively at this stage adds stress on top of stress. Wait until new healthy growth is clearly underway.
Step 4: Check your photoperiod. If you’ve been running lights for more than 18 hours, reduce it. Let plants rest.
Step 5: Monitor for 48–72 hours. New growth should come in healthy and green. Existing damaged leaves won’t recover — that’s normal. What you’re watching for is the problem stopping its progression, not existing damage disappearing.
Step 6: Remove severely damaged leaves once new growth is established. Once you’re confident the plant is recovering, you can trim away the worst-affected leaves to redirect energy. Don’t do this in the first 48 hours.
Plants typically stabilise within a few days of correction. Full visible recovery—with healthy new growth replacing damaged tissue—usually takes one to two weeks depending on how long the problem ran before diagnosis.
How to Prevent Light Burn in Hydroponics
Fixing light burn is reactive. Preventing it is where the real yield protection happens.
Match Intensity to Growth Stage From Day One
Set your fixture height and dimmer level based on the growth stage you’re in, not the one you’re heading toward. Most growers who get light burn in veg are running their light at full flowering intensity because they don’t want to bother adjusting it later. It costs them earlier.
Adjust Height Weekly — Not Just at Setup
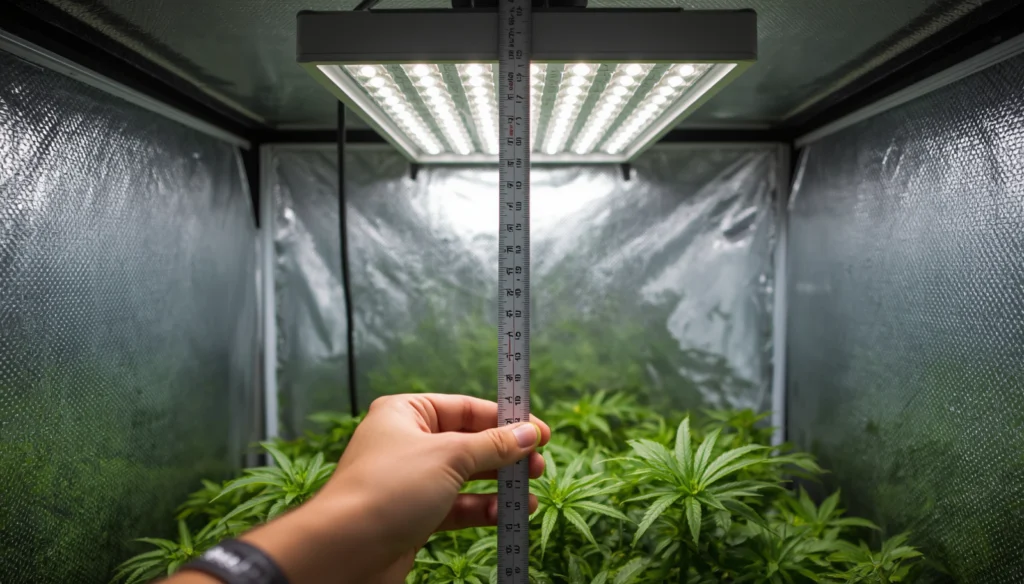
This is the most skipped step in most grow room routines. As plants grow upward, the effective distance between canopy and fixture shrinks. A once-correct hanging height becomes too close within a week or two during fast vegetative growth or pre-flower stretch.
Get into the habit of checking the gap between canopy and fixture at least once a week. Mark the current height on your ratchet hangers if it helps. The few seconds it takes to measure saves you from a light burn diagnosis two weeks later.
Use a Quantum PAR Meter to Know Your Actual Numbers
The most reliable prevention tool is direct measurement. A quantum PAR meter placed at canopy height tells you the actual PPFD your plants are receiving—removing the guesswork entirely. If you’re hitting 900 µmol/m²/s over seedlings, you don’t need to wait for symptoms to know something needs adjusting.
Our Grow Light Calculator can help you estimate PPFD based on your fixture and hanging height before you even take a physical measurement — useful for initial setup and planning.
Acclimate Plants to Intensity Increases Gradually
If you’re moving plants into a new, more powerful lighting environment—upgrading fixtures or moving from a propagation space to a main tent—don’t hit them with full intensity immediately. Start at 50–60% and ramp up over five to seven days. Plants adapt to higher light levels more successfully when the change happens incrementally rather than all at once.
Shop Smart: Dimmable LED Grow Lights That Give You Control
The single best prevention feature in a grow light is a smooth, full-range dimmer. It lets you start seedlings low, ramp up through vegetables, and hit full intensity for flowering—without ever moving the fixture to manage intensity.
Look for fixtures that dim from 0 to 100% continuously (not in fixed steps) with a quality named driver like Mean Well. Cheap dimmers are jerky, unreliable, and often introduce flicker that stresses plants in its own way.


FAQ: Light Burn on Plants
Can light-burned leaves recover?
No—leaves that have been bleached or crisped by light burn won’t return to normal. Once the photosynthetic tissue is damaged, that damage is permanent in the affected leaf. However, once you correct the cause (raise the light, reduce intensity), new growth will come in healthy. Focus on stopping the problem from progressing, not on healing existing damage.
How quickly does light burn develop?
Light burn can develop within 24–48 hours if a light is dramatically too close. In milder cases—where the fixture is only slightly over the threshold—symptoms may build gradually over one to two weeks, which is part of why it’s easy to misdiagnose as a slow-developing nutrient problem. The slower version is actually trickier to catch precisely because it doesn’t look like a sudden event.
Does light burn affect yield?
Yes, if it’s left uncorrected or happens during a critical stage. Damaged upper leaves contribute less to photosynthesis, and stress at peak flowering can reduce both fruit set and overall plant vigour. Catching it early and correcting quickly limits the long-term impact significantly. A few days of light burn on healthy plants mid-veg is recoverable; sustained light burn through flowering is more consequential.
Is light burn the same as heat stress?
They’re related but not identical. Heat stress is caused by the temperature the plant tissue experiences—radiant heat from the fixture or high ambient room temperature. Light burn (or photoinhibition) is caused specifically by excessive light intensity, even when the temperature at the canopy is perfectly acceptable. Modern LEDs can cause light burn at comfortable temperatures because they deliver high PPFD without significant radiant heat. That’s actually why LED-induced light burn caught many growers off guard when they first switched from HPS.
How do I tell light burn from a calcium or magnesium deficiency?
Cal-Mag deficiencies typically appear as interveinal chlorosis (yellowing between leaf veins while veins stay green), brown spots, or necrotic patches on mid-canopy or older leaves—not specifically on the uppermost leaves. Light burn concentrates symptoms on the top leaves closest to the light source, and the bleaching tends to be more uniform rather than spotty. Check the location first. If it’s only happening on the leaves directly under your fixture and everything below looks healthy, light is almost always the culprit.
One Problem, One Fix
Light burn is genuinely one of the simpler problems to resolve once you know what you’re looking at. Raise the light, reduce the intensity, and let the plant recover. The challenge is always the diagnosis—distinguishing it from nutrient issues, catching it before it compounds with other stresses, and adjusting your routine so it doesn’t come back next cycle.
The growers who avoid it consistently aren’t doing anything complicated. They’re checking light distance weekly, matching intensity to growth stage from the start, and measuring rather than guessing. Those habits pay off crop after crop.
Grow With Hydroponics has a full set of calculators and guides to help you dial in your lighting before problems start — from PPFD targeting by crop and growth stage to full spectrum selection guidance. Get the numbers right first, and light burn becomes a problem you read about rather than fix.