If you’ve ever tried to start seeds indoors only to watch them stretch into weak, pale imitations of themselves reaching for a windowsill, you know the frustration. You’re not alone.
Light—specifically, getting the right kind of light—is the single biggest factor that separates success from failure in indoor gardening.
That’s why more home growers are finally ditching the gamble of natural light and turning to grow lights for starting seeds, effectively bringing the power of the sun right into their kitchens, basements, or grow tents.
At Grow With Hydroponics, we’ve spent years helping growers troubleshoot that exact problem, turning spindly failures into crisp, vibrant seedlings beneath the glow of LEDs. Let’s break down how you can start your own seedling success story right under your own roof—without the guesswork.
Why Grow Lights Matter So Much for Starting Seeds?
When a seed cracks open, its first directive is simple: find light. It’s an urgent, biological mission. If the light source is too weak—and yes, even a bright south-facing window in February qualifies as weak—the seedling stretches its cells thin trying to reach it. This results in “leggy” growth: long, fragile stems that often flop over and dampen off before they ever see a garden bed.
Indoor ambient light simply isn’t enough for robust growth. This is where LED grow lights for seedlings become essential for successful indoor seed starting. They deliver the intensity and spectrum young plants crave, giving them the energy to focus on building thick stems and dense roots instead of just reaching for a photon. If you’re relying on natural light and wondering whether your window actually cuts it, try our Indoor Plant Sunlight Analysis System to measure what your seedlings are really getting.
Most people overestimate window light by a factor of ten.
Here’s the thing most people overlook: consistency is everything. With a controlled light source, your seedlings aren’t just surviving until spring—they’re actively thriving, building momentum for a head start you can’t get from a windowsill.
Choosing the Right Grow Lights for Starting Seeds
Walk into any hydroponic store or scroll through online listings, and the options are dizzying. Fluorescent T5s, quantum board LEDs, blurple panels, full-spectrum bars—how do you pick the right one for a tray of tomato seedlings?
1. LED vs. Fluorescent: What’s Best for 2026?
Frankly, this debate is mostly settled. LEDs have become the gold standard, and for good reason. They’re incredibly energy-efficient, run cool enough to sit safely inches from tender leaves, and they last for years. The real advantage, however, is spectral control. Modern full-spectrum LEDs mimic natural sunlight closely, which not only promotes faster, stockier growth but also lets you see the true color of your plants—making it easier to spot nutrient deficiencies or pests.
Fluorescent T5 fixtures still work; they’re a decent, inexpensive entry point. But they generate more heat, the bulbs degrade in output over time, and you’ll be replacing them far more often. In the long run, LEDs offer less hassle and more control.
Pro tip: When you’re browsing for gear, look for a fixture explicitly labeled “full-spectrum” or “daylight” (5000K–6500K color temperature). These mimic the sun most closely. And when you Shop Smart, focus on the fixture’s actual light output (PPF or PPFD) rather than just its wattage—a brighter-looking bulb isn’t always a more effective one.
2. Consider Intensity and Coverage
It’s not just about the light directly under the bar; coverage matters. Weak light at the edges of your tray will stunt those outer seedlings, leaving you with an uneven batch. A cheap but highly effective trick is to create reflective walls. Many experienced growers line the inside of their shelves with Mylar blankets or even flat-white paint to bounce stray light back onto the plants, ensuring every cell in every tray gets its fair share.
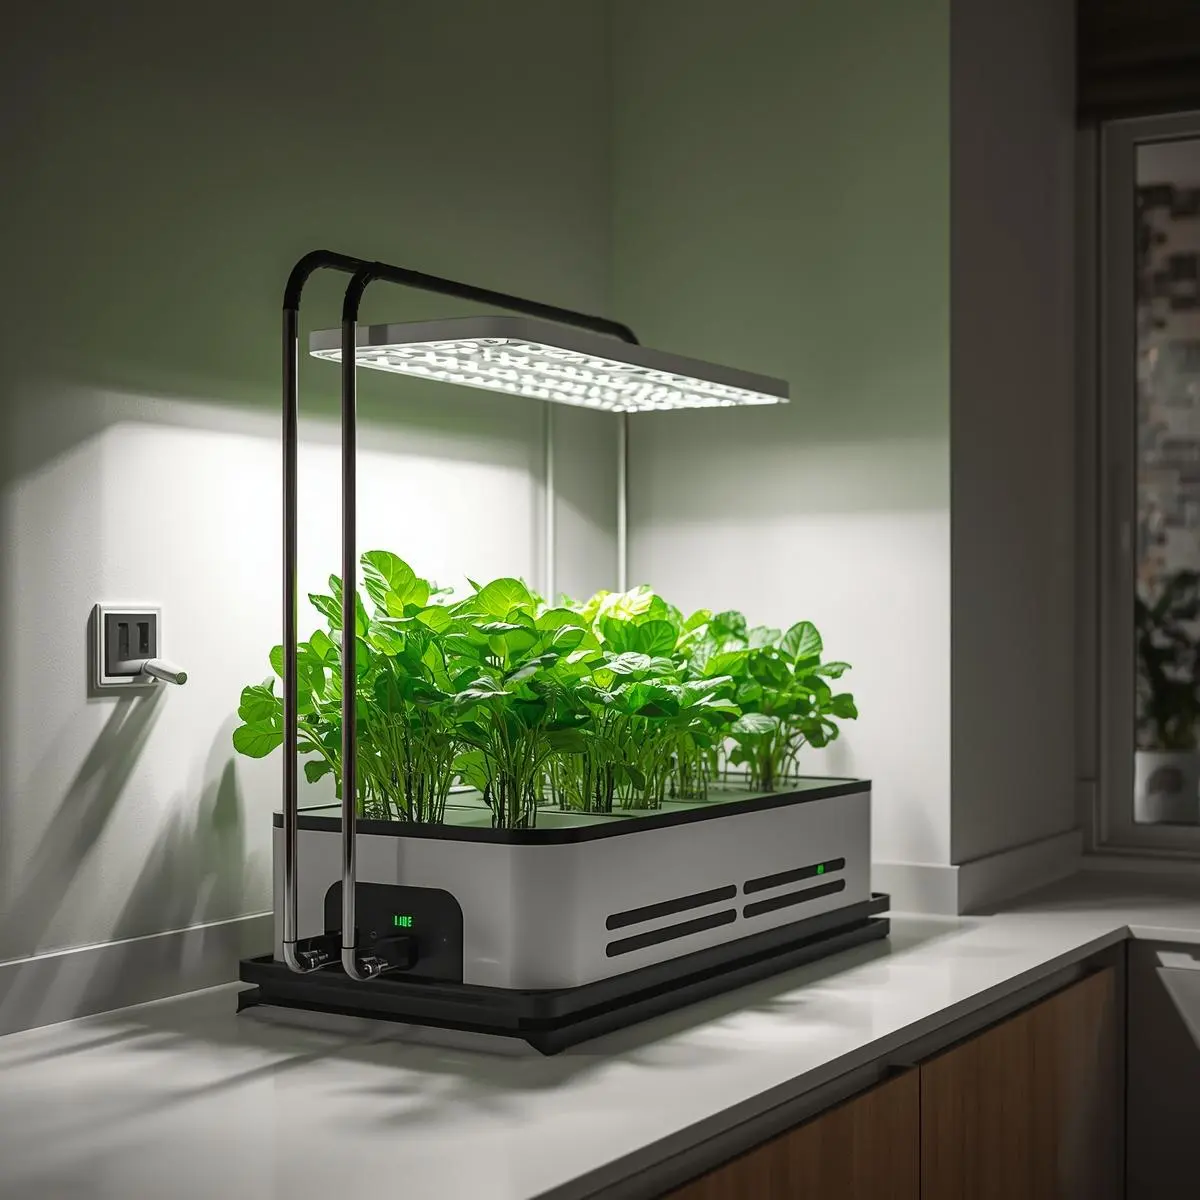
Setting Up Your Indoor Seed Starting Station
If you’re serious about starting seeds indoors with grow lights, take heart: the setup doesn’t need to be fancy or expensive. You can build a compact, ruthlessly efficient system on a shoestring budget.
What You’ll Need:
-
Seed trays or small pots (with drainage!)
-
Quality seed-starting mix (light and soilless)
-
A dimmable or height-adjustable grow light system (LEDs recommended)
-
An outlet timer (non-negotiable for consistency)
-
Thermometer (optional, but helpful)
Before you build, map it out. The Grow Space Planner lets you input your actual dimensions and see how many trays you can fit, where your light footprint will fall, and whether that shelving unit from the hardware store will actually work.
The Golden Rule of Height: Set your grow lights for starting seeds about 2–4 inches above the tops of your seedlings. I know it sounds close, but this is where most beginners go wrong. Place the light too far away and you get stretch. Place it too close? With modern LEDs, you’re more likely to dry out the soil surface than scorch the leaves, but it’s a risk. Adjust the light daily as they grow—it takes 30 seconds and saves you weeks of frustration.
And for goodness’ sake, buy a timer. Set it for 14–16 hours of light per day. Your seedlings don’t know it’s 3 a.m., and they won’t thank you for keeping the lights on 24/7. They need a dark period to rest and grow, just like we do.
How to Start Seeds Under Grow Lights (Step-by-Step)
If you’re staring at a packet of seeds wondering where to start, here’s the rhythm that works:
-
Moisten your mix: Dampen your seed-starting mix in a bucket beforehand. It should feel like a wrung-out sponge—moist, not soggy. Dry mix in a tray repels water.
-
Plant at the right depth: A good rule of thumb is to plant a seed twice as deep as its width. Tiny lettuce seeds sit on the surface; bean seeds go in deeper.
-
Cover and warm: Use a humidity dome or plastic wrap to trap moisture until you see the first green hooks emerging. Remove it immediately once they pop up.
-
Introduce the light: The moment you see sprouts, turn those lights on. No waiting.
-
Adjust daily: Keep the light source close and even. You’ll be amazed at how quickly those little green shoots reach for that LED glow—but because the light is intense and close, they’ll stay sturdy and compact, ready for transplanting.
Best Light Spectrum for Seedlings
This is a detail that often gets overlooked, but it makes a tangible difference in those first few weeks. Most seedlings respond best to cool white full-spectrum light with a color temperature between 5000K and 6500K. This range closely mimics the quality of spring sunlight, which signals to the young plant that it’s in an open, sunny environment. This encourages compact, sturdy growth and strong leaf development right from the start. The blue wavelengths in this spectrum are the primary drivers of vegetative growth, while the balanced full-spectrum light ensures efficient, healthy photosynthesis from day one. You’ll see the difference in stem thickness and leaf color within the first week.
You’ll be amazed at how quickly those little green shoots reach for that LED glow—but because the light is intense and close, and the spectrum is dialed in, they’ll stay sturdy and compact, ready for transplanting.
Growing Vegetables With Grow Lights for Starting Seeds
Once your seedlings are established, there’s no reason to kick them outside if you don’t want to. Many vegetables will happily live out their entire lives under lights, producing food year-round.
Vegetables That Thrive Indoors Under Lights:
-
Leafy greens: Lettuce, kale, spinach (these are practically made for indoor life).
-
Herbs: Basil, parsley, cilantro (just keep trimming basil to prevent flowering).
-
Fruiting plants: Compact cherry tomatoes, dwarf peppers, and even determinate bush beans.
Each of these does exceptionally well under grow lights for indoor plants, especially full-spectrum LEDs. I’ve seen a single cherry tomato plant in a five-gallon bucket, under a decent LED, produce fruit through December. The appeal for many home growers we talk to at Grow With Hydroponics is the convenience: no pests, no unpredictable weather stripping your leaves, and fresh herbs on the counter 365 days a year.
Budget-Friendly Grow Lights for Starting Seeds
Not every gardener wants to invest in commercial-grade fixtures, and you genuinely don’t have to. The market for affordable grow lamps has exploded. Many LED panels under $30 can easily cover a standard 1020 seedling tray with enough intensity to keep things honest. Compare our top-rated budget LED panels : Best Affordable LED Grow Lights (2026)—Budget Picks That Work.
Here’s a quick checklist for shopping on a budget:
-
Adjustable brightness? Nice to have, but not essential for seedlings.
-
Full-spectrum? Yes. Avoid the old “blurple” (red/blue) lights if you can—they make it impossible to diagnose plant health.
-
Cool operation? Essential. You don’t want a fixture that heats up your growing space.
-
Energy-efficient rating? Check the actual power draw from the wall, not just the “equivalent” wattage.
Common Mistakes to Avoid (and How to Fix Them)
Even with good lights, a few missteps can send you back to square one. Watch out for:
-
Lights too far away: This is the #1 cause of leggy seedlings. Lower the light.
-
Over-watering: Under LEDs, with lower temps and less airflow than the outdoors, the soil stays wet longer. Let the top layer dry out slightly between waterings.
-
Forgetting airflow: A tiny $10 clip-on fan, pointed away from the seedlings to just gently rustle the air in the room, works wonders. It prevents fungal gnats and strengthens stems.
-
Leaving lights on 24/7: Plants need respiration time. Darkness is when roots grow. Give them 6–8 hours of it.
- Ignoring the growing environment: Light intensity drives transpiration. If your air is too humid or too dry, even perfect light won’t save you. The VPD Calculator helps you dial in temperature and humidity so your plants can actually use all those photons you’re paying for.
That said, don’t let this list intimidate you. Every gardener learns through a bit of trial and error.
The beauty of indoor growing is the feedback loop is fast—you can tweak a condition and see a result in 24 hours.
When and How to Transplant Your Seedlings
Once your seedlings have developed at least two sets of “true leaves” (the second set that looks like the mature plant), it’s time to move them up to larger pots or into your hydroponic system.
Gently tease the roots apart if they’re circling the bottom of the cell. Keep the new soil or medium consistently moist, and maintain the same light intensity for a few days while they adjust. Think of it as helping them stretch their legs after a long car ride—they need a minute to acclimatize.
Lighting Schedule: The Secret Ingredient
Here’s the nuance that separates okay growers from great ones: timing matters just as much as brightness.
Most seedlings and young vegetables need 14–16 hours of light and 8–10 hours of darkness daily. This rhythm mirrors nature’s day-night cycle, promoting stronger stems and lush leaves. Timers make this effortless; just set it and forget it.
If you’re ready to move beyond the basics and really understand what makes a grow light worth your money, we’ve built a resource that goes deep on this. Our comprehensive guide, The Ultimate LED Grow Light Guide: Science-Backed Indoor Setup (2026), is essentially the book I wish I’d had when I started. At Grow With Hydroponics, we believe anyone can create that feeling, even in a tiny apartment. All it takes is a bit of light, consistent care, and the curiosity to keep tweaking your setup.
Frequently Asked Questions
Do you really need grow lights for starting seeds?
Yes. Natural window light is rarely strong or consistent enough in spring, winter, or even most summers. It will cause seedlings to stretch, weakening them before they even get started.
How long should seedlings be under grow lights each day?
Aim for 14–16 hours of light, followed by a strict 8 hours of darkness. A timer is the best tool to manage this automatically.
How close should LED grow lights be to seedlings?
Keep them about 2–4 inches above the tops of the plants. You should barely be able to fit your hand between the light and the leaves. Adjust the height daily as they grow.
Can I grow vegetables indoors year-round?
Absolutely. Leafy greens, many herbs, and compact vegetable varieties like dwarf peppers or micro tomatoes thrive indoors under consistent lighting.
What’s the best type of grow lights for starting seeds?
Full-spectrum LED grow lights provide the most balanced, intense energy for healthy, compact growth without the heat of old fluorescents.
Are cheap grow lamps effective?
Many affordable LED panels are surprisingly effective for small seed trays. Focus on full-spectrum models with a good track record. Read our guide to setting up a budget seed station