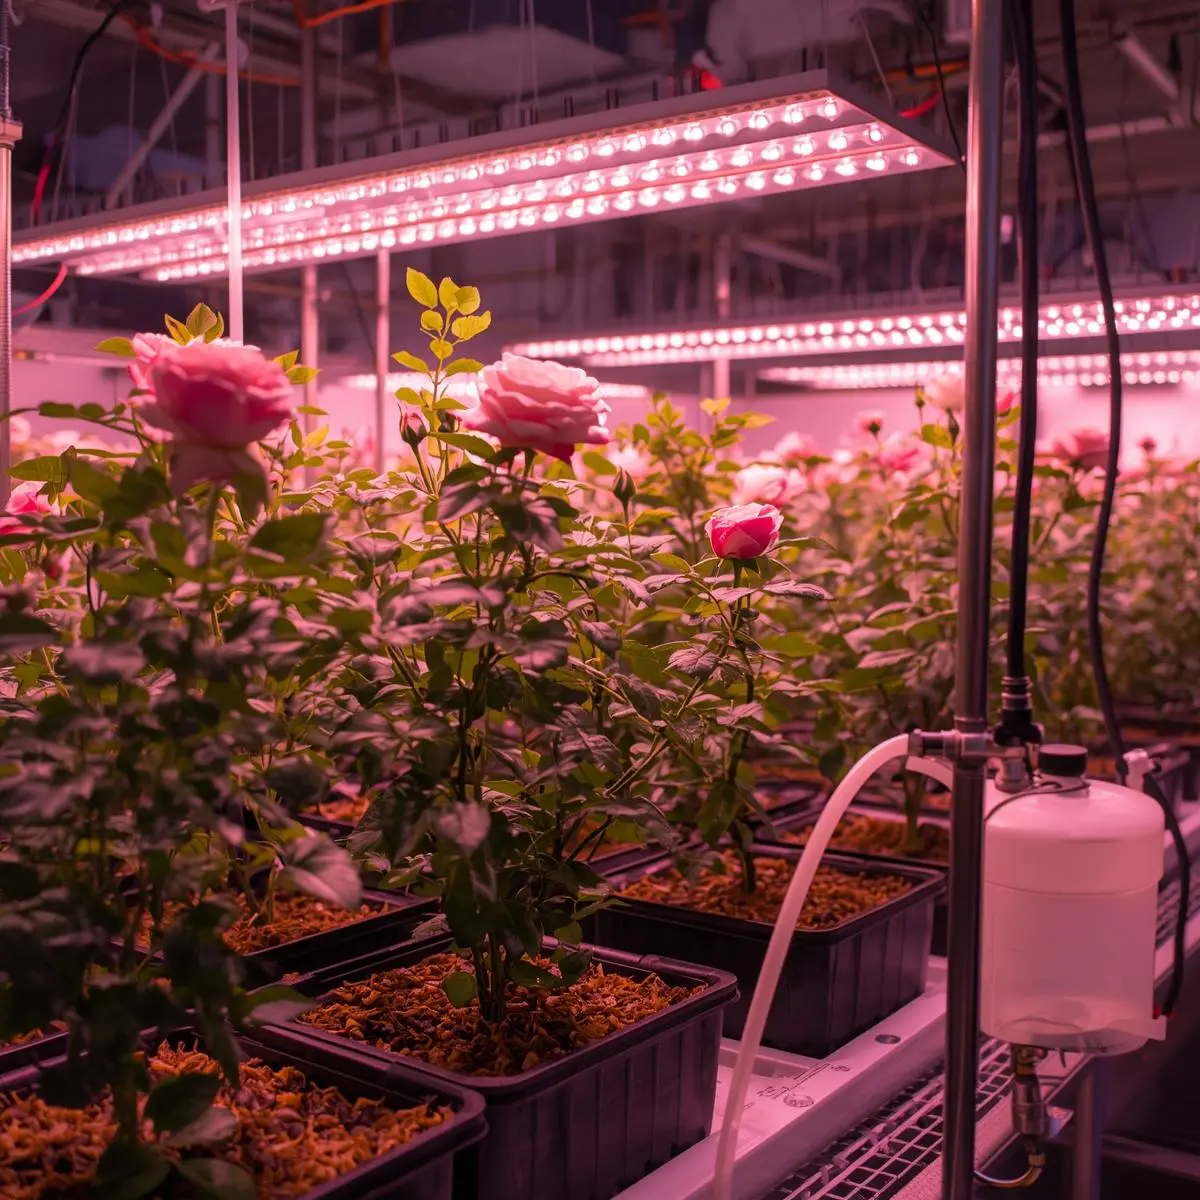
Growing roses hydroponically is already a commitment to precision—but designing a drip system for hydroponic roses takes that precision to the next level. If you’ve ever wrestled with coco coir that’s bone-dry on top and soggy at the bottom, or watched a perfect bloom stall out from a salt lock, you know the feeling. You’re not alone.
A well-designed drip system gives roses exactly what they’re notoriously picky about: steady, predictable conditions. It delivers nutrients directly to the root zone in pulses, not floods, which supports robust aeration and gives you surgical control over runoff. At Grow With Hydroponics, we’ve watched more than a few hobbyists push past the “pretty good” bloom ceiling and into exhibition-quality territory—simply by fixing their irrigation logic.
In this guide, we’ll cover:
Why a drip system works exceptionally well for roses
How to design and size your system correctly, the first time
A step-by-step implementation plan
Advanced optimization using tools like a VPD Calculator and Nutrient Calculator
Pro-level troubleshooting—the stuff you only learn by messing up
Let’s build this thing right.
Why Designing a Drip System for Hydroponic Roses Matters
Roses are heavy feeders with dense, aggressive root systems. They aren’t lettuce. They:
Develop woody stems and large vascular networks that demand consistent pressure
Require higher nutrient concentrations without the margin for error that implies
Need stable moisture but will punish you for waterlogging
React to EC and pH fluctuations faster than you can say “bud drop”
A drip irrigation system in hydroponics gives you controlled fertigation—that’s irrigation plus feeding in one precise action.
It’s the difference between watering your plants and feeding your ecosystem.
Without a proper system, you’re almost guaranteed to hit one of these walls:
Uneven moisture pockets in coco coir or rockwool
Creeping salt buildup from lazy runoff management
Root hypoxia from media that stays too wet, too long
Inconsistent bloom size and color that makes you question your nutrient brand
Designing a drip system for hydroponic roses eliminates these variables by delivering measured pulses instead of flooding cycles.
It’s about control, not just convenience.
Step 1 – Planning When Designing a Drip System for Hydroponic Roses
Before you buy a single fitting, you need a blueprint. Impulse-buying irrigation parts is a great way to build a very expensive leak.
What Type of Drip System Is Best for Hydroponic Roses?
You have two primary options, and the choice shapes everything downstream.
Run-to-waste (Drain-to-waste) :
Fresh nutrient solution for every cycle
Minimal risk of disease recirculation
More forgiving for beginners—if you mess up a mix, it’s a one-off, not a tank-wide disaster
Recirculating drip system :
Collects and reuses runoff, saving nutrients
Requires stricter, more frequent EC monitoring
Better for advanced growers who’ve dialed in their baseline
For most indoor rose growers, especially those working in smaller spaces, run-to-waste provides greater control and stability. It’s one less variable to chase.
How Much Water Do Hydroponic Roses Need?
If you’re looking for a universal schedule, stop. This depends on:
Growth stage: Vegetative roses drink differently than flowering ones.
Media type: Coco coir retains moisture; clay pebbles demand frequency.
Environmental factors: Temperature, humidity, and airflow drive transpiration.
Instead of guessing, use the VPD Calculator. It helps you balance temperature and humidity so that transpiration drives proper nutrient uptake. Frankly, if your VPD is off, your drip schedule will never feel “right”—you’ll be constantly over- or under-correcting.
Step 2 – Components Required When Designing a Drip System for Hydroponic Roses
A successful drip system is only as strong as its weakest part. And the weakest part is almost always the one you bought to save three dollars.
Essential Components :
Submersible water pump (matched to system size, not “what was on sale”)
Main supply tubing (½ inch is the standard for a reason)
Distribution tubing (¼ inch lines, preferably opaque to fight algae)
Pressure-compensating drip emitters (non-negotiable for consistent flow)
Timer or irrigation controller (with battery backup, if you’re smart)
Reservoir (opaque, food-grade—light + nutrients = sludge)
Growing containers with drainage
Runoff collection tray (or a shop vac and a lot of patience)
What Pump Size Should You Choose?
Don’t guess. Calculate:
Total emitters × flow rate per emitter = Required flow rate
For example:
8 plants
2 emitters per plant
Each emitter: 2 L/hour
Total = 32 L/hour minimum pump output (plus a healthy margin for head height and friction loss)
A simple mistake in pump sizing—like ignoring how high you’re pushing that water—can lead to the last plant on the line getting a trickle while the first one floods. Uneven delivery kills consistency.
Step 3 – Media Selection for Hydroponic Roses
The media you choose dictates your irrigation frequency and your margin for error.
Best Media Options :
Coco coir: Excellent water retention + aeration. Forgiving, familiar.
Rockwool slabs: Highly controlled moisture distribution. Less room for error, more predictable.
Clay pebbles: Superior drainage. Requires frequent pulses and a rock-solid timer.
If you’re comparing substrates and wondering which plays nicer with roses, you might find this useful: Coco Coir vs Rockwool for Roses.
Can I Use Tap Water for Hydroponics?
Short answer: sometimes. Long answer: test first.
Check for:
EC levels (if your tap water starts at 0.4, you’re mixing blind)
Chlorine/chloramine
Hardness (calcium can be a friend or a foe)
If your starting EC is high, nutrient mixing becomes an exercise in approximation. This is where the EC ↔ PPM Converter saves you from unit confusion and math errors. Know what you’re working with before you add a single drop of nutrients.
Step 4 – Nutrient Strategy in a Drip System for Hydroponic Roses
Roses are nutrient-hungry plants. They don’t mess around.
Typical ranges :
pH: 5.8–6.3
EC (Vegetative): 1.6–2.0
EC (Flowering): 2.0–2.4
These are targets, not laws. Watch your plants, not just your meter.
Instead of doing mental math while you’re trying to mix a fresh batch, use the Hydroponic Nutrient Calculator. It ensures fresh, accurate mixing based on your actual reservoir volume—no more “that looks about right” dilution.
When you need to adjust EC upward or downward without dumping the tank (because dumping is expensive and lazy), the Hydroponic Nutrient Optimizer helps you dial existing solution values to target. It’s the difference between fixing a problem and starting over.
Shop Smart
When you Shop Smart for pumps and drip emitters, choose pressure-compensating emitters. They maintain uniform flow even if line pressure fluctuates—especially important in multi-plant rose setups where the first and last plant need to be treated as equals.
Step 5 – Irrigation Scheduling for Hydroponic Roses
Now we move into the heart of designing a drip system for hydroponic roses. This is where the theory meets the timer.
How Often Should You Run the Drip System?
Start here, then adjust based on what you see:
2–4 feedings per day (vegetative)
3–6 feedings per day (flowering)
Each session: 1–3 minutes (depending on media)
The goal isn’t to hit a number. It’s to achieve:
✔ 10–20% runoff (this is your salt management)
✔ No dry pockets in the media
✔ No standing water in the catch tray
If you’re not getting runoff, you’re building a salt mine. If you’re getting too much, you’re wasting nutrients and stressing roots.
How Does Lighting Affect Drip Frequency?
High-intensity LEDs increase transpiration. A lot. Plants drink more when the lights are on full blast.
Before you start chasing your tail adjusting irrigation, use the DLI Calculator to plan your lighting schedule properly. If your DLI (Daily Light Integral) is excessive, roses will transpire more aggressively—meaning higher water demand during peak light hours.
For deeper optimization—like, PhD-level light nerdery—the Indoor Plant Sunlight Analysis System can evaluate photon exposure at the canopy level. It answers the question: “Is my light actually reaching the leaves, or just heating the air?”
Step 6 – Advanced Optimization When Designing a Drip System for Hydroponic Roses
This is where average growers separate from professionals. It’s not about buying better gear; it’s about using the gear you have smarter.
Environmental Control :
Balance these three, or fight them forever:
Temperature (22–26°C ideal range)
Relative Humidity (50–70%)
Air circulation (consistent, not a hurricane)
Use VPD logic—not guesswork. If your VPD is off, your plants can’t drink properly, no matter how perfect your drip schedule is.
Runoff Monitoring :
Check runoff weekly. It’s not optional.
Measure EC
Measure pH
Compare with input solution
If runoff EC climbs, salts are accumulating. Increase your runoff percentage temporarily to flush them out. If it drops, your plants are eating more than you’re feeding—or you’ve got a dilution issue.
Layout Efficiency :
Planning a larger rose grow? Winging it with a tape measure is how you end up with dead spots and awkward reaches.
The Grow Space Planner helps design efficient layouts before you drill a single hole. For testing airflow and irrigation behavior virtually—without getting your hands dirty—the Grow Space Simulator lets you experiment before committing hardware.
And if you’re mixing roses with companion crops (basil loves roses, by the way), consider the Multi-Crop Planner to avoid irrigation conflicts and staggered nutrient demands.
Common Mistakes in Designing a Drip System for Hydroponic Roses
Let’s save you months of frustration. I’ve made most of these so you don’t have to.
Overestimating pump capacity without accounting for head height. That pump rated for 500 GPH? At 4 feet of lift, it might be half that.
Placing emitters too far from the stem base. The roots aren’t in Kansas anymore; deliver to the root zone.
Ignoring runoff EC readings. If you’re not testing runoff, you’re flying blind.
Running long irrigation cycles instead of short pulses. Pulses keep media oxygenated; floods drown it.
Failing to clean lines monthly. Slime doesn’t care about your schedule.
Maintenance matters. Flush lines with clean water weekly to prevent clogs. An ounce of prevention, etc.
Frequently Asked Questions About Designing a Drip System for Hydroponic Roses
Can Drip Systems Cause Root Rot?
Only if you overwater or ignore drainage. Healthy runoff and oxygenated media prevent this. The system doesn’t cause rot—your management does.
Should Each Rose Have Two Emitters?
Yes. Dual emitters:
Promote even moisture distribution
Reduce dry spots
Protect against single emitter failure (because emitters will clog)
Is Recirculating Better Than Run-to-Waste?
Recirculating saves nutrients—but demands tighter EC monitoring and more frequent adjustments. Beginners almost always succeed faster with drain-to-waste systems. It’s less efficient with nutrients, but more efficient with your sanity.
Designing a Drip System for Hydroponic Roses Is About Control
When you step back, designing a drip system for hydroponic roses isn’t about tubing or pumps or fancy timers. It’s about control.
Control over:
Nutrient precision
Moisture stability
Environmental balance
Bloom consistency
Roses respond to consistency like few other plants. Once you dial it in—once the system fades into the background—you’ll see:
Stronger stems that hold up heavy blooms
Larger, more vibrantly colored flowers
Faster growth cycles with fewer hiccups
If you’re serious about elevating your rose grow, explore the practical tools and calculators available at Grow With Hydroponics. They’re built to remove guesswork and replace it with confidence.
You don’t need a million-dollar commercial greenhouse to grow stunning roses. You need a system that works with the plant instead of against it.
For a deeper dive into the whole process, from cutting to bloom, check out our complete guide: How to Grow Roses Hydroponically: Science-Backed Complete Guide (2026).
Start designing thoughtfully today—and let your next bloom prove it.